Choose a compliant payment processor
Implement One-Click Stablecoin Checkout works best as a clear sequence: define the constraint, compare the realistic options, test the tradeoff, and choose the path with the fewest hidden costs. That order keeps the advice usable instead of decorative. After each step, pause long enough to check whether the recommendation still fits the reader's actual situation. If it depends on perfect timing, unusual access, or a best-case budget, include a simpler fallback.
The simplest way to use this section is to write down the real constraint first, compare each option against it, and choose the path that still works outside ideal conditions.
Integrate the SDK into your storefront
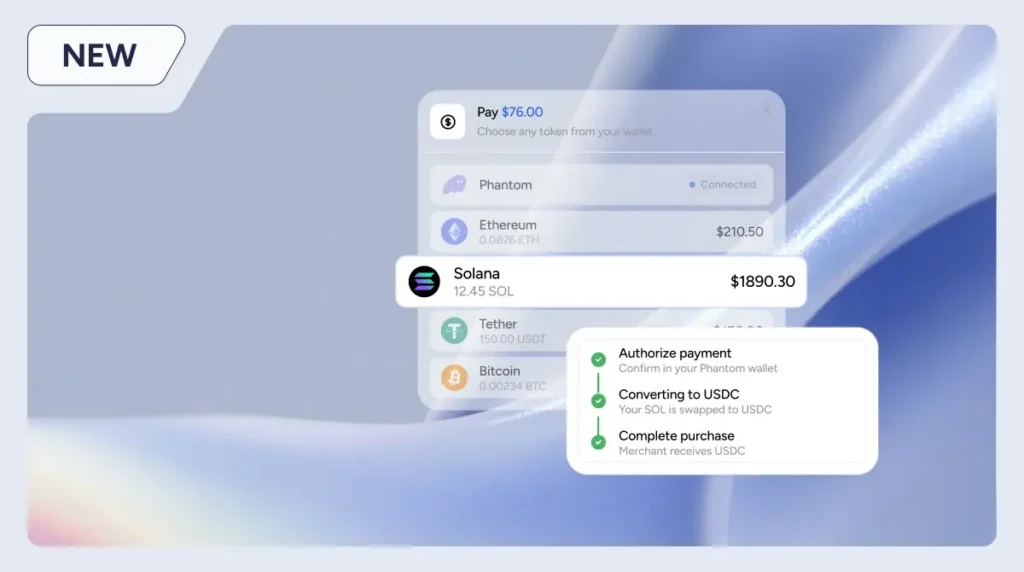
Embedding a stablecoin checkout SDK transforms your payment page from a manual entry form into a streamlined, one-click experience. The goal is to reduce friction so returning customers can pay with a single confirmation, similar to how digital wallets work for fiat transactions. This section walks through the technical steps to embed the widget, configure the one-click logic, and handle the transaction lifecycle.

Begin by installing the provider’s SDK into your project’s dependency list. For most modern storefronts, this is a simple command-line operation:
npm install @stablecoin-provider/checkout-sdk
Once installed, import the module in your main checkout component. Ensure you are using the latest stable version to benefit from current security patches and gas optimization features.
Initialize the SDK with your public API key and the specific stablecoin network you intend to support (e.g., USDC on Ethereum, Solana, or Polygon). This step establishes the connection between your storefront and the blockchain.
import { StablecoinCheckout } from '@stablecoin-provider/checkout-sdk';

const checkout = new StablecoinCheckout({
  apiKey: process.env.STABLECOIN_API_KEY,
  network: 'polygon',
  currency: 'USDC'
});
Configure the widget to render in a modal or inline container on your product page. The widget handles the complex wallet detection and signature requests, presenting a clean interface to the user.
One-click checkout relies on tokenized payment methods. When a customer pays for the first time, the SDK securely stores their wallet address and transaction preferences. For subsequent visits, the widget recognizes the user and skips the manual wallet connection step.
Enable the oneClick flag in your SDK configuration:
checkout.configure({
  oneClick: true,
  autoApprove: false // Recommend false for high-value transactions
});
Set autoApprove to false as a default safety measure. Even with one-click enabled, requiring a final signature on the device ensures the user explicitly authorizes each transaction, preventing accidental purchases.
Your frontend must listen for transaction events to update the UI and trigger order fulfillment. The SDK emits events like paymentSuccess, paymentFailed, and paymentPending.
checkout.on('paymentSuccess', (txHash) => {
  console.log('Payment confirmed:', txHash);
  // Update UI to show success message
  // Trigger backend order processing
});

checkout.on('paymentFailed', (error) => {
  console.error('Payment failed:', error);
  // Display error message to user
});
Ensure your backend verifies the transaction hash on the blockchain before marking the order as paid. This prevents false positives from frontend-only successes.

Before going live, run comprehensive tests using the provider’s sandbox environment. Test various scenarios:
- First-time user wallet connection
- Returning user one-click payment
- Failed transactions due to insufficient gas or network congestion
- Multi-currency switching if supported
Verify that the one-click experience works seamlessly across mobile and desktop browsers. Check that the wallet detection logic correctly identifies popular wallets like MetaMask, Phantom, or Coinbase Wallet.
By following these steps, you integrate a robust, one-click stablecoin checkout that reduces cart abandonment and improves the user experience for crypto-native customers. The SDK handles the heavy lifting of wallet interactions, allowing you to focus on product and conversion optimization.
Configure settlement and currency options
Settlement determines where the funds land after a customer pays. You must choose between holding the stablecoin in a digital wallet or converting it to fiat currency immediately. This decision dictates your exposure to blockchain network fees and your ability to pay traditional vendors.
Most merchants opt for instant fiat conversion to eliminate volatility risk. Even though stablecoins are pegged to the dollar, the peg can drift during high market stress. By converting to USD, EUR, or GBP at the point of sale, you lock in the exact revenue amount. This mirrors the experience of traditional credit card processing but settles on-chain.
Compare settlement models
The table below contrasts direct stablecoin settlement against instant fiat conversion. Direct settlement requires you to manage crypto wallets and tax reporting for digital assets. Instant conversion shifts the complexity to the payment processor but provides predictable cash flow.
| Feature | Direct Stablecoin Hold | Instant Fiat Conversion |
|---|---|---|
| Volatility Risk | Low (peg-dependent) | None |
| Tax Events | Complex (per-coin tracking) | Simple (fiat-only) |
| Payout Speed | Variable (blockchain time) | Next-day or instant |
| Vendor Payments | Requires crypto exchange | Direct to bank account |
Set up the conversion gateway
To enable automatic conversion, you must link a fiat wallet or bank account to your payment gateway. Providers like Checkout.com partner with infrastructure firms like Fireblocks to facilitate this flow. When a customer pays in USDC, the gateway swaps the asset and deposits the equivalent fiat value into your linked bank account.
Ensure your currency settings match your operational base. If you pay suppliers in Euros, configure the settlement currency to EUR. The gateway will handle the USDC-to-EUR conversion, though you will pay a small spread on the exchange rate. This spread is typically lower than the combined cost of currency conversion and wire fees associated with traditional cross-border banking.
Test the transaction flow thoroughly
Before launching one-click stablecoin checkout, you must verify the entire payment lifecycle. A single failure point—such as a blockchain confirmation delay or a wallet signature error—can break the user experience. Treat testing as a stress test for the integration, not just a functional check.
Simulate end-to-end payments
Run transactions through your staging environment using real stablecoins on a testnet (like Sepolia for Ethereum or Goerli for older networks). Verify that the "one-click" button correctly triggers the wallet signature and that the merchant dashboard updates immediately upon broadcast. Check edge cases: what happens if the user switches networks mid-transaction or if the gas price spikes?
Validate error handling and retries
Network congestion is common. Ensure your system gracefully handles failed transactions without losing the order data. If a payment times out, the user should be able to retry without re-entering their shipping details. This resilience is critical for maintaining trust in a crypto-native checkout flow.
Audit security and compliance
Verify that your smart contract interactions are secure. Use official documentation from providers like Stripe or TransFi to ensure your integration follows current best practices for stablecoin settlement. Avoid relying on third-party wrappers that may not support the latest ERC-20 standards.
Addressing Merchant Concerns on Liquidity and Cash-Out
Merchants often worry about the final step of the transaction: converting digital assets into usable fiat. The process is designed to be as straightforward as traditional card payments, with the primary difference being the settlement speed and the underlying infrastructure.
How do I convert stablecoin payments into fiat?
When a customer pays in a stablecoin like USDC or USDT, the payment processor acts as the bridge. You do not need to hold or manage the cryptocurrency yourself. The processor receives the stablecoin, converts it at the prevailing market rate, and settles the funds into your bank account in your local currency. This eliminates exposure to crypto volatility for your business.
Is cashing out stablecoins difficult or slow?
No. The conversion and settlement happen automatically. According to the Bank of England, stablecoins are backed by stable assets, allowing holders to exchange coins for bank money "easily and without losing anything." For merchants, this means the liquidity is immediate upon settlement. You receive fiat, not digital tokens, simplifying your accounting and tax reporting.
Do I need a crypto wallet to accept these payments?
Not necessarily. Major payment gateways like Checkout.com enable stablecoin acceptance by handling the blockchain interactions behind the scenes. Eligible enterprise merchants can accept payments from consumers without maintaining their own cold storage or managing private keys. The gateway manages the custody and conversion, allowing you to integrate crypto payments using existing merchant interfaces.
No comments yet. Be the first to share your thoughts!